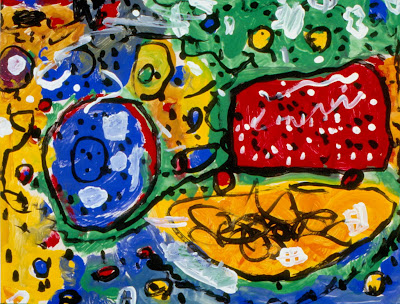
- Working with shapes
- Planning use of the whole paper
- Using large and small paint brushes
- Painting wet paint over dry paint
- Enhancing paintings with lines and patterns
line, shape, geometric, free-form, positive shape, negative shape, pattern
YOU WILL NEED
- Medium weight manila paper approximately 18 by 20 inches
- Liquid tempera paints—three or four colors plus black and white
- Small containers for tempera paints
- Large and small paint brushes
- Containers of water for rinsing brushes
- Sponges for drying brushes
First Session
Preparation
- Set out paper and large paint brushes.
- Set out containers of colored tempera paints, containers of water, and dampened sponges.
- Explain to the children that, in this session, they will be using paint to fill their papers with lots of colorful shapes.
- Demonstrate to the children how a shape is formed by drawing in the air with your finger. First make different types of lines, such as straight, curvy, and squiggly. Then show them that when a line goes around and meets itself or closes up, a shape is formed. Explain that there are regular or geometric shapes, such as circles, squares, triangles, and rectangles. When a squiggly or irregular line meets itself, a free-form shape is created.
- Demonstrate to the children two approaches to painting shapes on their papers. One way is to paint a line until it meets itself and then fill it in with color. A second way is to start with a blob of paint and spread it out into a shape. Tell the children that the shapes they paint are called positive shapes. The unpainted areas between the painted shapes form negative shapes.
- Give the children large paint brushes. Have them fill their papers with shapes and then paint any negative shapes formed by their painted shapes.
- When the papers are completely filled, set the paintings aside to dry.
Second Session
Preparation
- Display the dried paintings for discussion.
- Set out containers of black and white tempera paint.
- If possible, set out two small paint brushes per child to avoid having to rinse between colors. This will keep the black and white paint from becoming watered-down, making a brighter contrast against the colored shapes. If using only one brush per child, set out water containers and sponges.
- Explain to the children that they will be enhancing their paintings of shapes by adding lines and patterns using black and white paint. Be sure that they understand they will be adding to their shapes and colors, not covering them up.
- Discuss the shapes made in the paintings from the previous session, both geometric and free-form. To enhance the paintings, show the children how with a small brush they can choose to outline their shapes, make shapes within shapes, add a variety of lines, or repeat lines and shapes to create patterns on their paintings. Explain that they will first be using black paint and then changing to white paint.
- Give the children their paintings. Hand out the small paint brushes and containers of black paint. Have the children add lines and patterns, encouraging them to add designs on the whole paper.
- When enough designs have been added with the black paint, change to the white paint. Once again, encourage the children to add designs in a balanced manner on the whole paper.
- Set paintings aside to dry.
- Use liquid tempera paint for this project because of its ease of use for the children and its vibrant colors.
- When working with three- to four-year-old children, it’s helpful to tape the edges of their papers to the work surface to hold the papers in place.
- Three-year-old children tend to paint all the colors in one spot. Keep encouraging them to paint the colors next to each other and to fill the whole paper. It's helpful to turn their papers if they have trouble reaching all areas.
- It’s a good idea to limit the amount of time with the black and white paint to avoid having all the shapes and colors covered up.
- Are all areas of the papers covered with paint?
- Ask the children to point out geometric and free-form shapes.
- Discuss how the lines and patterns enhance the paintings.
- I like hearts. Can I make all my shapes hearts?
- I painted white over my black paint and now my brush only makes gray.
- Uh oh...my yellow shape is hiding under my black paint.
- I want to make some black dots on my white line. Can I have the black paint back?
- You can decide which shapes you’d like to use. However, you may need to make some free-form shapes to fill up the spaces between your hearts.
- When black and white paint mix together, they make gray paint which also looks nice on your painting. If you'd like, I will wipe your brush clean so that the white will be bright again.
- We'd like to see the beautiful colors and shapes that you made, so be careful not to cover them all up with the black paint.
- Black dots on your white line is a great idea. However, before you change back to black paint, be sure you have completed all of your white designs.


